Note: The following guidebook was intended for Ubuntu 18.04 users. Although much of the procedure will still apply, please keep this in mind when installing it in your own operating system. 🙂
Step 0: Get a Glimpse of What MESA is About.
My personal research in the past and present hasn’t really involved stellar astrophysics, so it wasn’t until my graduate level Stars and Planet course that I stumbled upon MESA. As with anything you add onto your computer, it’s best to obtain some basic understanding on what it is prior to embarking on any installation procedures.
For the purpose of this tutorial, we can proceed with the following knowledge:
MESA, the Modules for Experiments in Stellar Astrophysics, is a toolkit used in computational stellar astrophysics to better understand stellar structure and evolution.
So it does cool star stuff. Neat!
Step 1: Head on Over to the MESA Website.
Click over to the official MESA homepage located at http://mesa.sourceforge.net/index.html.
The website includes information about the motivation for its design, an outline about the code’s capabilities, several guides on how to get started, and a ton of helpful resources in case everything goes awry.
Step 2: Join the MESA Mailing List.
Note: This step is completely optional.
MESA developers encourage users to join the MESA mailing list before beginning to use the software. An integral portion of the available MESA documentation was brought to be by the experiences of community users. If you join the mailing list, you’ll be the first to know about latest releases and MESA-related news. More importantly, through the mailing list, you can always reach out to the community if you run into a problem. And once you become an expert, you can help new users by answering potential queries. 🙂
You can join the MESA mailing list at https://lists.mesastar.org/mailman/listinfo/mesa-users.
Step 3: Check the MESA Map and Add Yourself to It!
Note: This step is completely optional. But who wouldn’t want to do it?
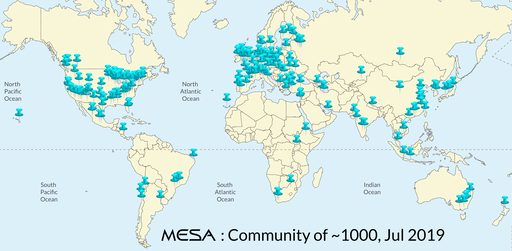
The MESA community is a tightly-knit one and they encourage new users to add their location to the MESA Map. To do so, shoot an request via email to Frank T. His information is located under “Check the MESA Map” at http://mesa.sourceforge.net/prereqs.html.
Surprisingly, he responded to my request less than an hour after I submitted it. Looking forward to seeing an extra push pin on the map in the future update!
Step 4: Verify Your Operating System Meets the Basic Requirements.
Taken directly from the Prereq & Install page, the basic requirements are the following:
Mac or Linux operating system (Windows users may want to try MESA-Docker)
64-bit processor
8 GB RAM
20 GB free disk space
Ensure that you meet all of these requirements.
Step 5: Install the MESA Software Development Kit (SDK)
To install MESA with minimal fuss and issues, its best to install the MESA Software Development Kit (SDK) first. Please note that it is only compatible with Mac and Linux.
First, visit the MESA SDK homepage at http://www.astro.wisc.edu/~townsend/static.php?ref=mesasdk.
The website details the SDK compatibility requirements and prerequisites for your particular operating system. As I am using Ubuntu 18.04, it was necessary to install the following packages:
binutils
make
perl
libx11-6, libx11-dev
zlib1g, zlib1g-dev
tcsh
Installing these packages was as easy as typing the following line into my terminal.
sudo apt-get install <PACKAGE_NAME>Most of these were already installed with my Linux distribution, with the exception of tcsh. Still, it was important to verify that these necessary packages were indeed present in my operating system.
Now, lets move on to installing the SDK itself.
The latest release is available in the format of a tarball at the MESA SDK homepage. Download the tarball to your machine. Depending on your internet connection, this can take quite some time! Use these extra minutes to do some productive tasks like cleaning up after dinner, responding to that one email you’ve neglected for 4 months, or maybe laying down on the floor to alleviate some stress in your vertebrae.
Once it is downloaded, open up your Terminal, and go to your home directory, or wherever you wish to place the package.
Extract the package using the following command.
tar xvfz <PACKAGE_NAME> -C ~/Then, activate the C shell by typing the following in the terminal.
tcshAnd set the path to the SDK using the following command, where <PATH> corresponds to where you extracted mesasdk.
setenv MESASDK_ROOT ~/<PATH>/mesasdkIn the same C shell, initialize the SDK through.
source $MESASDK_ROOT/bin/mesasdk_init.cshThis simultaneously checks for compatibility. If everything is going well, no errors should arise!
Then, verify that SDK is installed properly by executing the following.
gfortran --versionIf all is well, you should see the following message.
GNU Fortran (GCC) 10.2.0
Copyright (C) 2020 Free Software Foundation, Inc.
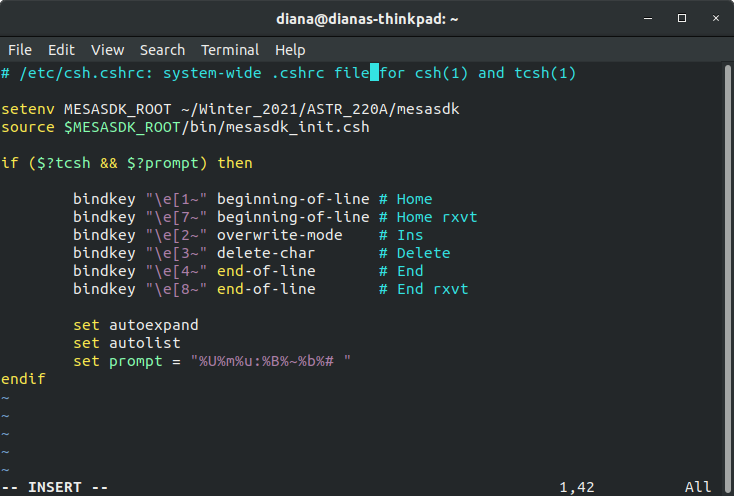
...Unless you’d like to repeat the setenv and source commands every single time you activate the C shell, locate your “.cshrc” file and add those two lines. For me, the file looks something like this.
Alternatively, you can also set and source these environments in your “.bashrc” file. This is the way to go if you are planning on installing MESA using your bash terminal rather than your C shell. My edited “.bashrc” file looks like this.

Phew. That was a lot, but very well worth it. We’re now ready to install MESA.
Step 6: Download, Unzip, and Install MESA.
The latest MESA release is available here. The zipped file itself is ~2 GB large so it might take some time to download as well. After the download is complete, go to your bash terminal (not C shell!) and unzip the file using the following command:
unzip <PATH>/<MESA_FILE>.zipPlease note that once unzipped and installed, the package is around 20 GB! So make sure you have plenty of space before proceeding with installation.
Unzipping should have created a new mesa-* directory. Switch to that directory and run the following command:
./installWait patiently for a few minutes. Close all the Stack Overflow tabs, you wont be needing them anymore. Breathe deeply. And finally, sigh in relief when the following message appears:

Final Thoughts and Resources.
A big thank you goes to all of those who contributed to the available resources and supporting documentation for MESA. Most of this tutorial is a condensation and expansion of the incredibly well-detailed guides found in the official MESA and MESA SDK homepages, linked below. I hope this mini guidebook facilitates the installation procedure for new users like me. 🙂
http://mesa.sourceforge.net/index.html
http://www.astro.wisc.edu/~townsend/static.php?ref=mesasdk
Disclaimer: In no way am I associated with MESA or MESA SDK. Opinions expressed throughout this blog post are entirely mine.
